Saturday, 20 September 2014

Gifts fit for a baby

Some good friends of ours have just had a little girl, who was born two weeks ago. When we knew they were expecting a present from the stork, I just knew I wanted to make something, but what I didn't know.

It was time to break out those knitting needles again, even though I don't really consider myself much of a knitter, the gift just had to be knitted. I eventually found this blanket pattern on Ravelry. It looked easy enough and one which I didn't really have to think much about!
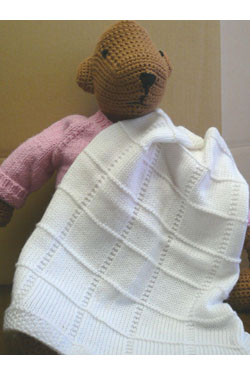
 
OK well, I'm sure the knitted toy made it look even better! But the moss stitch edging and the ridges with blocks of stocking stitch were just really simple and unfussy.

I found this yellow acrylic wool in Spotlight. They had a sale on and these 100g balls were only $5 - bargain! I didn't really go for cheap, I was looking for a yellow and didn't want wool, which might not be best for sensitive baby skin.

 
The pattern was so easy to make up, it just took forever, about two months! I decided to go for the largest size, 33" by 31" according to the pattern. This meant I had rows with 173 stitches on them. It took at least 10 minutes to stitch a row. The ridges are made by knitting a purl row instead of knitting. I have to say that before starting this my purl knitting (purling?) was decidedly slow, it got significantly better time I'd finished.

 
The baby's father is mad on the local football team (their colours are black and yellow) and Mum is mad on Formula 1 racing and originally I thought to edge it with black bias ribbon and stitch racing cars and footballs to the blanket. I couldn't find the latter and in the end found these cute little fellas (do they need an introduction?)

 
...and remembered both Mum and Dad's love of Despicable Me. Minions it was! So a couple were handstitched to the blanket. I have to say, it was the best choice ever.


I found some ribbon to add just that little homemade touch...


The second part of the gift came from a Facebook discussion. Baby's Dad put an image on FB of this
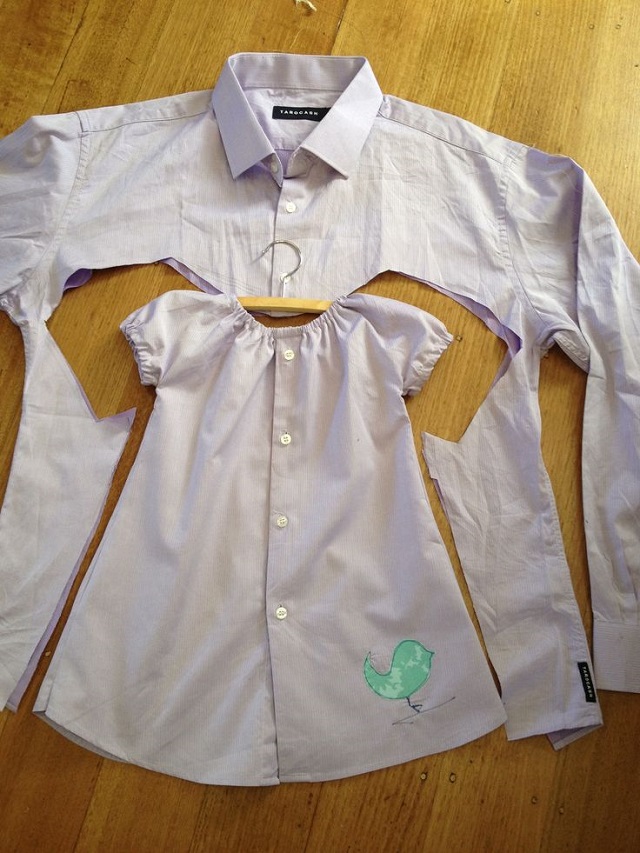
Baby Girl Dress Upcycled from Men's Shirt - DIY 

...wishing that Mum to be (at the time) could make one. Muggins here said something similar to "I have sewing machine..." And the rest they say is history! Yep, before long I was presented with a shirt to make a baby dress.

I found the original website which had this image to check out what was needed. Now, I know little about baby clothes, so off I went to the local department store to check out baby dress sizes!

I drafted my own pattern more by guess work, although there was a certain amount of measuring taking place. ;-)


I cut the pattern on the fold ensuring the button band on the front was central and the hem was the shirt hem.


I decided to try to sew self-bound seams. They provide strong seams for baby and children's clothes. Mind you, sewing these seams on the arms was a nightmare! There's not a lot of room there!

A spare button has been attached to one seam

As you can just about see in the photo above, the original shirt had purple binding around the inside neck. It gave me an idea to finish the neck and sleeves with purple binding.


I didn't cut the neck and sleeves big enough to require elastic in them, so it's not exactly like the the orginal on the All Day Chic website. The other thing I did was to remove the buttons, stitch up the button holes, attach brand new purple flower buttons and then stitch large snap fasteners on the inside. Fast removal is a good thing with baby clothes :-)


I'm really happy how this turned out. It's a wee bit big for baby at the moment - she's three weeks old! However, the best thing is that she has a dress to go into which isn't pink! I feel brave enough to try make some more of these, perhaps sleeveless so that they can be layered more easily for the cooler weather.


Friday, 12 September 2014

Loud golf III - the houndstooth!

The third iteration of the Loud Golf trews, as a know how much you all love them. Again, I had a request for more and was driven down to Spotlight/Fabric Warehouse on a combined trip ;-)


Please excuse the photos, Mr N really does not like having his photo taken and doesn't like time being spent on composition or anything.

I actually made these, all bar the hemming in time for The Monthly Stitch mono sewn month, which seems like an age ago (July).

There really is little to say about these. I made the same changes as with Mark II, and this time, I actually drafted pattern pieces to make it easier! So I drafted pieces for the front slash pockets. They work so much better than in seam pockets, not that you can see it very well in this photo :-)


I also enlarged the back pockets too.


I was lazy and didn't try to match the pattern anywhere ;-) Just check out that houndstooth! I finished both the inside and outside leg seams using a flat felled seam. It's not easy with trousers sewing flat felled seams! The top stitching was all done using black cotton. I actually used a metal zip for the trousers this time. Hopefully this will be a bit stronger.


And so the details...  
Fabric: Cotton twill from Spotlight, May 2014.
Notions:   Thread, a metal zip, interfacing for the waistband and a button for the waistband too.
Pattern:  Vogue 8719
First worn:  To a trip to Wainuiomata Golf Club with a friend on a very wet day in late August.
Changes made:   Altered the inseam side pockets to be slash pockets and also enlarged the back pockets.
Another one?  There is another pair in the offing - beware!

One last photo... Don't ask!


Monday, 8 September 2014

The Jenna Cardi

This is the new pattern from one of my lovely WSBN friends here in Welly. The amazing Kat launched Muse last week with this first pattern, the Jenna cardi, named after her equally lovely sister.


I was lucky enough to be one of the testers. It's actually the first time I've tested a pattern and I was so flattered when asked, my mind went into overdrive! Crazy English lady that I am!

Straight away I printed it out and stuck it all together, I just couldn't wait to get going! The pattern pieces lined up perfectly. Some patterns I've printed are just slightly out, but this one was perfect (yes I was using a printer I'd used before.) Next was to find something from stash I could use to make it up. The fabric was a wool viscose and very loosely woven, plus it slipped and slid everywhere. Note to self, don't sew with wool viscose unless completely necessary!


I cut out a size 40, simply because I'm halfway between sizes. My fabric choice was poor and in hindsight, the 38 would have been plenty big enough!  Anyway, this pattern has lots of options with sleeve lengths and the optional yoke detail. It's also sized from a 32 to 48, which should cater for a lot of sizes.


I decided the longer hip length cardi with long sleeves would get the most wear, but since I didn't really have the amount of fabric recommended I had to ignore the cutting layout (not ideal, but sometimes needs must.) I also realised there wasn't enough for the sleeves! Help! Then I checked them out, they were too long for me, so I happily cut them a couple of inches shorter.

Please note: I wasn't the only one with short arms and the long sleeve pattern pieces have now been altered in the published pattern, so you should all be AOK.


I did cut the side seams curved as in the pattern, but with my loosely knitted fabric, this didn't work and I actually stitched the side seams straight down from the waist. This works brilliantly with my fabric giving me a loose fit cardi which goes with so many things in my wardrobe...

Gabrianna, Mortmain, Cami, unblogged pencil skirt, Tania culottes and Kay Unger dress to mention but a few ;-)

I think Kat has actually altered this hip length curve slightly since testing to make this fit better.


I think that's enough on the fit, what about the construction? Well if you want an easy cardi pattern, this is the one for you. It goes together so quickly, I'd cut it out and made it up in about four/five hours total. All my seams are finished with a wide zig-zag stitch and so it would be even quicker if you use an overlocker (which I don't have).

The instructions are really well written with clear pictures. I'm a great one for looking at the pictures and ignoring the instructions and Kat's images didn't disappoint. What I really like is that the sleeves are attached before sewing the whole side seam from cuff to waist. I love this type of construction which gives a really clean finish and is so much easier to insert sleeves this way. The cuffs for the sleeve and waist give a really nice finish to this pattern, giving it a great fit.


The button band is interfaced with non-stretch interfacing ensuring the button band keeps it's shape and is really structured. I spent ages cogitating and ruminating over the buttons, in the end I went with these silver pink flowery buttons I got from Fabric-a-Brac.


The details
Fabric:  A ribbed pink wool viscose from Fabric-a-Brac, October 2013
Notions:   Non-sretch interfacing, thread and buttons from Fabric-a-Brac, February 2014.
Pattern:  Jenna cardi - the first pattern from Muse Patterns
First worn:  As soon as I'd finished it, about a week ago!
Worn here with:  A RTW skirt from Zara (old from the UK), purple tights and black boots from Overland. Oh and a hat I've knitted (not blogged about).
Changes made:  Since I was testing, I made as the pattern said. The only change I made was to stitch straight down the side seam.
Another one?  I think I might just have to. This pattern is fabulous. I'd love to find a much more structured knit to create the version with the yoke.


No outtakes this time, but a sad end to the tale :-( I wore this lots, then washed it in exactly the same way as before I cut it. I dried it flat too and the cardi has stretched widthways (the stretch way) and shurnk in the length :'( I'm currently at a loss with what to do, I might try washing it again and being even more careful how I lay it flat.

Thursday, 4 September 2014

The Great WSBN Sewing Room Tour

So the WSBN (Wellington Sewing Bloggers Network) thought you'd like a Sewing Room Tour and on our blogs throughout September, we'll be showcasing our sewing rooms, our fave makes, WIPs, and possibly even our favourite parts of the city - well Wellington is the Coolest Little Capital in the World and you can't beat it on a good day ;-)

The harbour from the top of Te Ahumairangi Hill

I'm lucky, our house has four bedrooms and one is my sewing room, although we do keep it permanently as a guest room for a single person, so I have to be reasonably tidy! Mind you, I have to say it is hard sometimes!

Do come on in...


Yes, the single bed stays, it's about the best place for it to go instead of against a wall, so the floor space is relatively limited. I tend to cut out on the lounge floor upstairs, or I have even been known to cut out on the upstairs deck in the sunshine. :-)


Anyway, back to my own room, I've got a sliding door which I can open out onto the lower deck. This faces due north which means I get all the sunshine and fantastic light.

On the left by the window is my desk (which is an old drop leaf dining table) where my sewing machines are. Then on the right are a few book shelves and some storage (ha ha, the latter sounds so posh, it's not really!)

Looking from the other end (from the deck) you can see the bed, another cupboard and a wardrobe.


My work area... Not the largest of tables and a bit wobbly at times, but I've managed to use it in this state to make enormous curtains, so I'm happy. It's also a useful table if we have a dinner party (then I frantically have to tidy and clear it up to take it upstairs!)

The chair was Mr N's mothers, known as Nannabelle's chair! I love this chair and I think I might make a seat pad for it and re-varnish at some point. A heater is a must for the winter - it can get cold in that room!


You can see my machines on the table. The Janome (John Lewis) machine on the right is my main machine. I got this for GBP 99 about six years ago, it's a basic machine, but I can do button holes, use a twin needle, stitch blind hems, etc so I'm happy with it. I've not used my old Singer for a while and unfortunately the case got damaged coming from the UK, so I need to get that fixed and the machine serviced. It is a great machine though and is fantastic for thicker fabrics.


The cupboard at the far end


This is where I keep all my patterns, notions and also my music. This is my room and so my music stuff also has a home in my sewing room.


The case beside the wardrobe is my 'cello in it's case. I don't claim to be the best player in the world and haven't really played it since I got to NZ, but I haven't the heart to get rid of it. The dolls house on top of the cupboard was built for my by my Dad when I was little. At the time, I was the height of luxury having electric lighting! Unfortunately that doesn't work at the moment and the house definitely needs renovating - another thing that's on my long list of things to do! Here's the inside for those who are interested...


The shelves in the corner have my sewing books and also yet more music. Plus some of my favourite ornaments on the display shelves. My fabric is in a box under the bed and also in a case and the ottoman in the corner...


Oh you want close ups? The shelves and some of the fabric... I've tried to reference some of my fabric on Evernote, but got very frustrated and didn't know the best way to reference it on there, so it kinda got left and now I don't really know what I have got and what I haven't! Any suggestions welcomed!


A hint at the view outside my window is in the photo above, but if you really need a distraction while sewing, this is the real view from my chair! It's lovely in the summer I can open the ranch slider and sit on the deck hand sewing! Jealous? Of course you are ;-) Although being full north facing we do get the full prevailing winds, which in Wellington are quite often strong and northerly... It's not called windy Wellington for nothing! Oh and the hills the other side of the valley are on the other side of the Wellington fault... Plus I can even wave across the valley to one of my fellow WSBN members!


Works in progress (or in my head) are numerous! I've got a couple of things on the go, plus about another half a dozen or more queued up ready to go! So just a few to keep me out of mischief - there really are not enough hours to sew all these. I need some time off work to sew!

A second Simplicity 3673 in a purple wool...

Papercut La Sylphide in a burnt orange and also a black/cream viscose

Then I've got a Sewaholic Yaletown planned (both dress and blouse), a walkaway dress (Butterick 4790), Papercut Petal skirt, another shirt dress of some description, leggings, Papercut circle top, Sewaholic Cambie, Sewaholic Alma or Pendrell(s), a cardi, some more loud golf trews (Vogue 8719), a couple of shirts for Mr N (Burda 7767), a quick short pencil skirt... Oh and I need to hem the lounge curtains I made a year ago which have been hanging ever since to "drop out". Methinks they'll be well and truly dropped out :-) And that's not to mention some knitting which is also on the go and planned - help!

I think I'd find it hard to say which are my favourite makes, I love my Mortmain which I made earlier this year and also my Gabrianna (made for TMS Indie Pattern Month). Then I've also got other fave makes - my Alma, my Daisy Anna, and my purple Renfrew.


I'll finish with a few of my fave photos of Wellington, just to make you jealous of our fab little city. Does something make you think I love this place (even though I've only been here two and a half years?)

Looking towards Karori on a frosty winter's evening from just round the corner from our house

Makara Beach

Just round from Owhiro Bay looking towards the South Island 
(if you look carefully you might actually see snow in the distance)

OK the sun doesn't always shine here, but, well...

Thanks to Gemma for coming up with the idea and kicking us off on Monday. So the last words from the Crazy English Lady - I seem to have that nickname here in NZ although I'm unsure why ;-) - don't forget to check out Juliet's (our very own Crazy Gypsy) blog tomorrow for the next installment!