It was time to break out those knitting needles again, even though I don't really consider myself much of a knitter, the gift just had to be knitted. I eventually found this blanket pattern on Ravelry. It looked easy enough and one which I didn't really have to think much about!
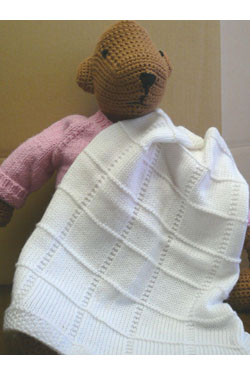
OK well, I'm sure the knitted toy made it look even better! But the moss stitch edging and the ridges with blocks of stocking stitch were just really simple and unfussy.
I found this yellow acrylic wool in Spotlight. They had a sale on and these 100g balls were only $5 - bargain! I didn't really go for cheap, I was looking for a yellow and didn't want wool, which might not be best for sensitive baby skin.

The pattern was so easy to make up, it just took forever, about two months! I decided to go for the largest size, 33" by 31" according to the pattern. This meant I had rows with 173 stitches on them. It took at least 10 minutes to stitch a row. The ridges are made by knitting a purl row instead of knitting. I have to say that before starting this my purl knitting (purling?) was decidedly slow, it got significantly better time I'd finished.

The baby's father is mad on the local football team (their colours are black and yellow) and Mum is mad on Formula 1 racing and originally I thought to edge it with black bias ribbon and stitch racing cars and footballs to the blanket. I couldn't find the latter and in the end found these cute little fellas (do they need an introduction?)

...and remembered both Mum and Dad's love of Despicable Me. Minions it was! So a couple were handstitched to the blanket. I have to say, it was the best choice ever.


The pattern was so easy to make up, it just took forever, about two months! I decided to go for the largest size, 33" by 31" according to the pattern. This meant I had rows with 173 stitches on them. It took at least 10 minutes to stitch a row. The ridges are made by knitting a purl row instead of knitting. I have to say that before starting this my purl knitting (purling?) was decidedly slow, it got significantly better time I'd finished.
The baby's father is mad on the local football team (their colours are black and yellow) and Mum is mad on Formula 1 racing and originally I thought to edge it with black bias ribbon and stitch racing cars and footballs to the blanket. I couldn't find the latter and in the end found these cute little fellas (do they need an introduction?)
...and remembered both Mum and Dad's love of Despicable Me. Minions it was! So a couple were handstitched to the blanket. I have to say, it was the best choice ever.
I found some ribbon to add just that little homemade touch...

The second part of the gift came from a Facebook discussion. Baby's Dad put an image on FB of this
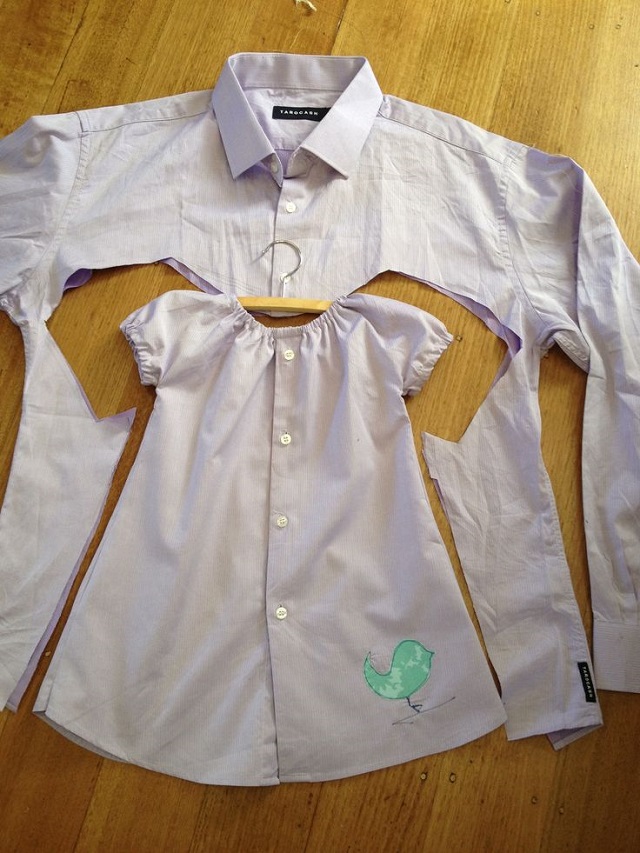
...wishing that Mum to be (at the time) could make one. Muggins here said something similar to "I have sewing machine..." And the rest they say is history! Yep, before long I was presented with a shirt to make a baby dress.
I found the original website which had this image to check out what was needed. Now, I know little about baby clothes, so off I went to the local department store to check out baby dress sizes!
I drafted my own pattern more by guess work, although there was a certain amount of measuring taking place. ;-)

I cut the pattern on the fold ensuring the button band on the front was central and the hem was the shirt hem.

I decided to try to sew self-bound seams. They provide strong seams for baby and children's clothes. Mind you, sewing these seams on the arms was a nightmare! There's not a lot of room there!

A spare button has been attached to one seam
As you can just about see in the photo above, the original shirt had purple binding around the inside neck. It gave me an idea to finish the neck and sleeves with purple binding.

I didn't cut the neck and sleeves big enough to require elastic in them, so it's not exactly like the the orginal on the All Day Chic website. The other thing I did was to remove the buttons, stitch up the button holes, attach brand new purple flower buttons and then stitch large snap fasteners on the inside. Fast removal is a good thing with baby clothes :-)

I'm really happy how this turned out. It's a wee bit big for baby at the moment - she's three weeks old! However, the best thing is that she has a dress to go into which isn't pink! I feel brave enough to try make some more of these, perhaps sleeveless so that they can be layered more easily for the cooler weather.

Oh so cute! Love the dress!!!
ReplyDeleteThanks, I'm quite chuffed how it's turned out.
ReplyDelete